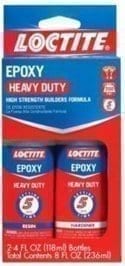
Two part epoxy is the only glue that creates a permanent bond and it is the only glue recommended by professional jewelers. These step-by-step instructions ensure success and remove all of the guess work.
What Brand Should you Buy?
 All brands work and are basically the same. However I like the epoxy that comes in stand up plastic bottles as they will stay cleaner than tubes. The bottles prevent the glue from oozing out, whereas the tubes get messy very quickly. The double syringe dispensing styles seem like a good idea to get equal amounts from each tube but they often don’t dispense equally and it is difficult to adjust the amounts when they don’t work correctly.
The stand up bottles can be a bit more expensive than others, about $18 at Home Depot, but it will probably last you for several years.
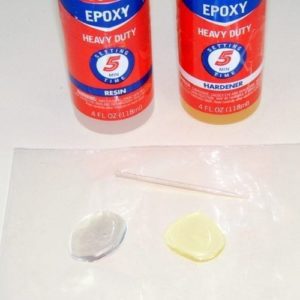
One tube will be labeled Resin and the other Hardener. Even though Hardener appears to be yellow, that is just so you can tell them apart, it will dry clear.
Be sure not mix up the caps, or they will get glued on permanently.
I recommend using epoxy with a 5 minute setting time. This should give you about two to three minutes of working time before the epoxy starts to set up. Which should be plenty of time even for a novice.
Choosing a Clasp
Choose a clasp with a similar outside diameter as the braid.
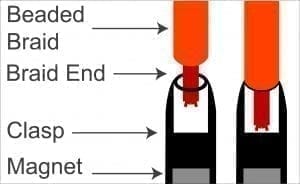 The braid does not need to fill the entire opening of the clasp opening. This is one of the advantages of 2-part epoxy, it forms a secure bond between the clasp and the braid nub even when there is empty space inside the clasp. This removes the extra work of binding the end of the braid.
When gluing a clasp on a beaded braid, only the un-beaded nub should be glued inside the clasp opening, no beads need to be inside the clasp.
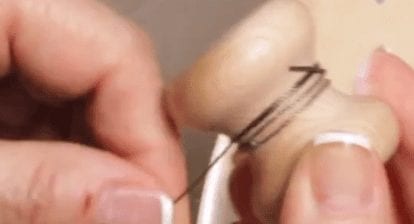
Do a Dry Fit
Check to see if the braid end fits into the clasp opening. The braid nub should not be visible. If it is a beaded braid the beads should be snugged up against the clasp. If necessary trim or shorten the braid nub.
Make Friends with Gravity
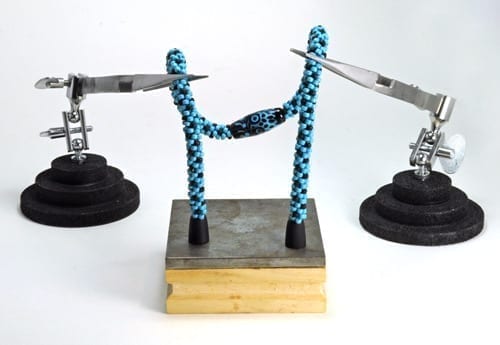
The secret to keeping glue inside the clasp and not on the braid is to use gravity to your advantage. If the clasp opening is pointed upward gravity will keep the epoxy inside the clasp. But be sure not to use too much epoxy or the braid nub will push epoxy out of the clasp opening and make a mess. If the magnet is flush with the bottom of the clasp, you can place it on something metal, like a jewelers bench block as shown in photo. The magnet will attach firmly to the metal and keep it from sliding around while you are working.
Also, find a way to keep the braid will need to be suspended above the clasp. A set of third hand tweezers work well. Sometimes a plastic bobbin can be used, simply place the clasp in the center hole.
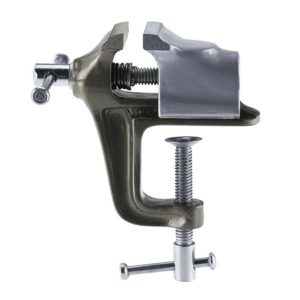
For other types of clasps a small jeweler’s vise is a handy tool to have. A small clamp on bench vise can be purchased at RioGrande.com for about $14.00.
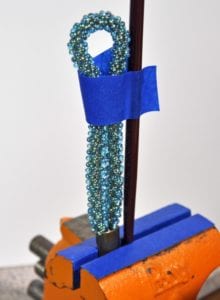
A chopstick or a dowel can be inserted into the vise jaws with the clasp and be used to hold the braid upright. Simply use painter’s tape to attach the braid to the chopstick to hold the braid upright while drying.
Get Ready
Have all supplies ready:
• The braid and clasp
• The epoxy
• A plastic bag, this should be large enough to dispense and mix the epoxy, a good use for used plastic bags. I don’t recommend using aluminum foil as it can easily tear when you are mixing the epoxy.
• A couple of toothpicks
• A paper towel or rag without a pile, a T-shire rag is perfect.
Gluing
Until you get comfortable using epoxy I strongly recommend that you glue one side of the clasp and let it set up for about an hour before gluing the other side. I know you will want to use up all that epoxy once you have mixed it up but it is not worth messing up your project for a few cents worth of epoxy. You have invested a lot of time in your project, now is not the time to be impatient.
- Get the braid and clasp set up and ready.

- Dispense equal amounts of epoxy from each tube. Keep them apart from each other. Let sit for several minutes and allow to settle. As long as the two parts are not touching or mixed together, the epoxy can sit for a long time. After it has settled it is easier to see if both amounts are equal. If you are not sure, err on the side of more hardener than resin.
- Use a toothpick and mix both parts together until they are well blended. The mixture will become a solid color.
- Using the same toothpick and add the epoxy to the inside of the clasp opening filling about half way. Distribute some of the epoxy up the sides of the clasp. The amount of epoxy needed will depend on the size of your braid nub. If the braid nub is not a uniform shape a small amount of epoxy can be added to the braid nub to ensure even coverage. Fill the clasp opening about half way and spread epoxy all the way up the sides.
- Insert the braid end into clasp opening. If necessary remove braid end to either add or take out some of the epoxy. If you have too little epoxy you will not get a secure bond. Too much epoxy will force glue out of the clasp and into the beaded braid.
- Reinsert the braid nub and firmly hold the braid in place while applying downward pressure for several minutes. Once the braid is secured in the clasp you can let go. I know it is ready to be released when the braid does not move when I release my grip.
- Use the rag or paper towel and immediately wipe off any excess glue from the outside of the clasp and braid. Don’t make the mistake of thinking you can remove epoxy later, it is permanent!
- Let braid stay in position for about one hour while the epoxy sets.
- Follow steps 1 – 8 and glue the other end of the clasp.
- It will take 24 hours for the epoxy to cure so wait until tomorrow before you wear your new piece of jewelry.
Sometimes it is possible to glue both ends at the same time using the same mixture of epoxy. However, I do not recommend this until you become proficient using epoxy. It is worth spending a few cents on the extra glue to have a professional looking finish for your project.